How to Bandage Wrap the Lymphedema Leg
One of the best posts on how to wrap a leg…from one of my online members:
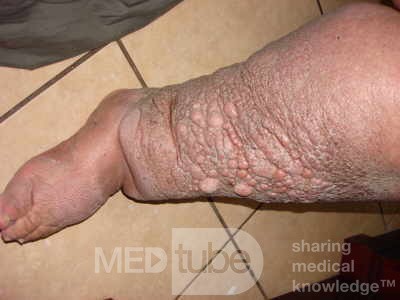
Since you have the swelling in the feet (and toes), it is probably lymphedema, perhaps compounded with lipedema. The traditional bandaging technique is with a stockinet, then some artiflex (cotton padding), and lastly, the bandages. I bandage directly over the skin. The padding is supposed to even out if you should constrict some part of the bandaging, causing the lymph not to flow, but the bandages are really not like rubber bands – properly spaced and overlapped, they will not cause constriction – and the artiflex is a pain. The stockinet is just another thing to wash and dry. I went to a bandage supplier (now out of business) and found that they have new bandages that are thick enough to be used without layering (e.g. the stockinet and padding).
Perhaps this is the way to go, or perhaps you want to bother with stockinets and padding. If you were seeing a therapist, they would also use foam instead of artiflex (just cotton padding). Some pictures of bandaging look absolutely monstrous. My so called therapist used some foam, etc., but I soon discovered that the leg went down more without it. The pad is supposed to “spread” the compression so there is no binding – but what really happens is all the elasticity of the bandages goes to compressing the FOAM – not compressing your leg. A little compression trickles down to the actual leg, but my experience was that the swelling went down better without the extra stuff. However, since this is against tradition, you should at least be aware if any part of your leg feels too tight, and, if so redo the bandages (which is at least an hour for two legs – and bandages that were OK while you were up and around can suddenly become too tight in the middle of the night – which means you have to get up and do it again.)
Anyway, with or without stockinet and padding, here is one technique for bandaging:
Materials (1 large leg not grossly larger than normal (I am 5'9” and the calf measure is 21” and I have wide, swollen feet - if you are substantially larger, you may need more)
optional: stockinet, artiflex, foam
required:
1 roll 1” professional strength masking tape. 1 ea 3” strip of heavy padding around the ankles 1 ea 1” x 5m medi-rip 2 ea 8 cm. x 5 m short stretch bandages 1 ea 10 cm x 10 m short stretch bandages 1 ea 6 cm x 5 m short stretch bandages.
Double for 2 legs, if you are very much larger than me, add another 1 ea 10 cm. x 5 m short stretch bandage for each leg.
I sit on my bed and have a low table I can rest my foot on, but two chairs will work also (one to sit on and one to put your foot on).
Wrap the 3” strip of heavy padding (or chock pads) around the ankles. The figure 8's you are making around your foot and from the foot onto the leg will tend to bind right at the intersection of the foot and leg (where the 90” turn is made. This is the only place padding is essential.
Secure it with masking tape. Secure all the bandages after they have been wrapped with masking tape. Cut a lot of 5” strips of masking tape and have them ready. Stick them on the edge of the table, or a windowsill, or something.
First hold all the bandages so that you are drawing from the bottom of the bandage cylinder (the bandages rolled up are a cylinder), not the top. A little experimentation will show you that this is much easier.
Start with the 1” medi-rip (it is a self cohesive bandage, but looses some of the self cohesion with laundering). Use this tiny bandage to bandage along the toe line. That is, make the same arc that the joints of the toes to the feet make. Do not bind the toes. If you can, wrap each toe with it, but I find that this binds the toes and hurts, so I leave my toes unwrapped, even though they swell, but if you start with the larger short stretch bandages, there will be a half moon that swells even more (Since if you make a straight circle from just below the little toe to just below the big toe, this will leave some area of foot not bandaged and the lymph will be pushed into this area, and it will be worse than before. The little 1” medirip can be wrapped in a curved path that covers all of the foot. Overlap this 1” medirep by 1/2 and continue winding it around your foot until you get to the end of the arch, then take it up diagonally over the top of the foot, and you will still have enough bandage to wrap again just under the toe line again for a few wraps. The medi wrap has strands of elastic in an otherwise cotton strip, so pull the medirip tight (that is the elastic is extended, but not to the point of discomfort).
When you wrap the bandages, pull a bit at the end of each circle, but do not stretch them too hard, or with constant tension as far as they will stretch. You want them to exert a little spring, but don't strangle your legs. If you get them too tight, it will hurt, and you must undo your wrapping and redo it (a big pain). If you don't stretch them a little, they won't have much compression. Of course, it's always the bottom bandages on the feet that hurt, so you have to unwrap the whole deal to get to them.
Next,step 2 take a 8 cm. x 5 m short stretch bandage, and start at the tip of the foot, but do not bind any toes, and since you already have the medi-rip, allow a little breathing space to make sure you don't bind toes. Then wind around your foot overlapping the bandages by about 1/2 to 2/3 (I probably overlap 2/3) until you have gotten almost to the leg (your foot should be at a 90 degree angle to the leg, and for me this is 2 or 3 wraps), then go around the heel itself, and, as you come off the other side of the heel, take the bandage diagonally up on the top of the foot to just below the top of the first wrap (just under the bottom of the big toe), go around the bottom of the foot, and then bring the bandage back around the ankle just above the heel, then around the ankle, and back up diagonally across the top of the foot just like before, overlapping 1/2 to 2/3 of the previous path. This will make large figure 8s.
Continue with the figure 8's each layer a little higher around the ankle, until you again are wrapping just in front of the leg (no more space to do another figure 8) and use the rest of the bandages going in straight circles (not figure 8's) around the ankles.
Next,step 3 take the second 8 cm x 5 meter short stretch bandage, and start at the base of the leg (around the ankles), go around once or twice, to anchor the bandage, then on the next turn go down around the bottom of the foot close to the heel, and then around the bottom of the foot and then over and up around the leg, then continue making figure 8's up the leg overlapping by about 2/3.
To make a figure 8 around the leg, on one side of the front of the leg, the bandage is going uphill (or towards your knee), then it goes more or less straight around the back of the leg at the high end of the 8, then goes downhill (or towards the foot), as you come across the front of the leg again, then more or less straight across the back of the leg at the low end of the 8 and then up again for the next figure 8. On me, this bandage is finished just about at the beginning of the calf (a little above the bottom of the muscle – it would be ideal if this bandage ended just before the muscle begins, but it will be a bit different for everyone depending of how much they overlap and how large their leg is.
Next,step 4 do figure 8's with the 10 cm x 10 m bandage. Begin at the bottom of the leg with the beginning of the bandage facing upward, so the first direction is in a downward direction, (the end pointing up) coming around and then going up again. The 10 cm x 10 m bandage should take you up to just below the knee, but if the legs are very large, you may need another 10 cm. bandage. Each course of the figure 8 should overlap a little less or evenly, but not more than the previous course. The more you overlap the greater the compression, and you must always have less compression proximally (towards your heart) than distally (towards your toes).
Finally,step 5 take the last 6 cm. x 5 meter short stretch bandage and start at about mid calf or a little higher, and wind in straight circles until just below and as close as possible to the knee. This last bandage gives compression over the tops of the top 8's where there is not as much overlap, and sort of holds it all up, as the circumference of the leg is actually smaller at the knee than at the mid calf (doesn't slide down because a smaller circle would have to slide over a larger circumference of the leg).
I have been complemented on my ability to wrap, but It is hard to know if a novice can make much sense of my directions – but I tried. You don't see to many photographs of the figure 8's, but they give more compression and stay up better, and bind less. You will get the general idea of winding up the leg, and overlap by looking at the photographs, however. It may seem complicated to follow my directions (I tried to be clear), but the real technique is not very hard at all.
The new thick bandages that do not need padding (padding is included) are : KomprimED. They are located on the bandagesplus web site under bandages, then under two way stretch bandages. I think you should start with these, as the padding may be more important for someone who is just beginning bandages. This is much simpler than all those stupid layers.
*Soft and comfortable directly on patient's skin *Thicker texture avoids application of foam and padding in many cases *Suitable for lymphedema and venous ulcers *Patient-friendly application requires less layers *All bandages are short-stretch/low stretch KomprimED 4cmx5m
Other wise, the standard short stretch bandages are rosidal or comprilan. I use rosidal. The medi-rip is under the section cohesive bandages on page 2 under the more general category bandages.
Suppliers of Bandages, Wrapping materials and Supplies: